
Cocopeat Coir Method

Firstly, we would like to say that there are many different ways to germinate your seeds. Opinions and methods vary and the starting point for any undertaking these days always warrants checking the internet. The internet has a wealth of information on this and there is no hard or fast rule as to how to do this. This having been said, the method we will demonstrate in this article is the Coco Coir Peat method, which is very popular among chilliheads the world over. There are other mediums such as Germination Mix, Rock Wool, Jiffy Pellets for instance. If you would like to try these, please do check the internet for instructions on how to use these.
We would encourage growers to start their chilli germination before spring. This gives you a head start on the season, meaning plants will be that much bigger by the time spring roll around and you will get a good head start on the grow season, a longer grow period and hopefully more pods ultimately!
What makes this method so attractive is that it is less involved than the Ziploc method. Seeds are germinated and can grow in the Coco Peat medium right up to adolescent seedling stage. The medium is slightly acidic which aids germination. It is also semi sterile, meaning there is lowered risk of bacterial or fungal infections causing seeds to rot in the medium as can be often the case with germination mixes. Coco Peat has great aeration and water properties and is reputed to be an excellent medium for growing Chilli as well as Tomato seedlings. In our experience, we have seen better seedling root development in Coco Peat than with other methods we have tried. Furthermore, once ready to transplant, the whole seedling and plug can be planted in the container or soil with minimal disturbance of the roots.
Before we get started we would like to say that there is no fail safe method that will guarantee germination or success. Mother Nature is not a guaranteed thing and sometimes for inexplicable reasons germination will not take place. We experience this too from time to time. Usually it has to do with temperature or growing conditions. If any one of the criteria for germination is not met, germination does not take place. In the same token we have had seeds that did not germinate this way and once thrown into soil, seeds suddenly start germinating.
We need to point out that we are providing this article and method as it is a recognized method of germination. We are not guaranteeing that this method will provide germination for you. We are not endorsing this method for success over and above any other method. Nor will we accept responsibility for germination not taking place. This method is as a guideline and help resource only. It is a method we have used and it has worked for us.
When is the best time to grow Chillies.
In South Africa our chilli grow season ranges from first weeks of October until first weeks of May (weather depending). Unfortunately chillies will go dormant and even die off if exposed to winter temperatures - in particular sub-zero temperatures. This having been said, chillies require minimum temperatures above 10ºC to grow and thrive. They generally enjoy as much sunshine as they can get and prefer very hot climates.
Some growers with the facilities, will grow their chillies through winter indoors (called "overwintering"). And it is good practice to start germination of seeds a few weeks before the last frost.
Pro's & Con's of this method
This method is relatively cheap and convenient. Coco Peat is excellent for starting your chilli seeds. Coco Peat Coir has less microbes than more conventional soil mixes, which means less fungus and bacterial spores that can cause rot. The slightly acidic nature of Coco Peat and its good aeration and water properties make Coco Peat a very good substrate for chillies. Root development of seedlings in Coco Peat is also brilliant. Having said this, the quality of the Coco Peat is of paramount importance. Just because it says Coco Peat does not mean it is good for growing. Without getting into too much detail, you need to make sure the Coco Peat Coir in the block is buffered and the pH calibrated. Without these standards, Coco Peat can be too acidic, resulting in bad germination and seedling fatalities. Seedlings grown in Coco Peat that is not buffered and too acidic will result in disaster. If your Coco Peat block does not say that it is buffered and pH calibrated, you will need to check the pH and buffer the Coco Peat yourself... which can be impossible for first time growers and difficult at best for experienced growers. Our best recommendation is to use Our Recommended Germination method.
1. What you will need

- Packet Chilli Seeds (Chillihead seeds of course :))
- Coco peat Coir Brick. (Look for Buffered & ph calibrated) If not, Coco Peat will need buffering.
- Seedling Tray
- Bucket
- Permanent Marker
- Tags
- Pencil
- (Optional but advisable) Gloves
- Spring Water or Rain Water (recommended)
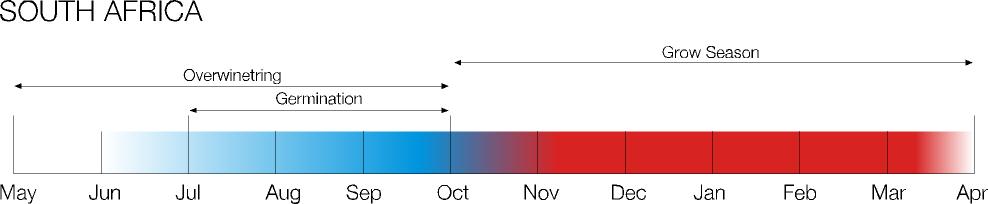
2. Soaking the Coco peat Brick
Coco peat Coir Bricks can be found at many nurseries. Alternatively, check the manufacturer/distributor for details (www.progrow.co.za).
Coco peat Coir blocks are made from compressed and dried Coco peat, produced from aged and mature brown coconut husks. It is also know as Coco peat or simply Coir.
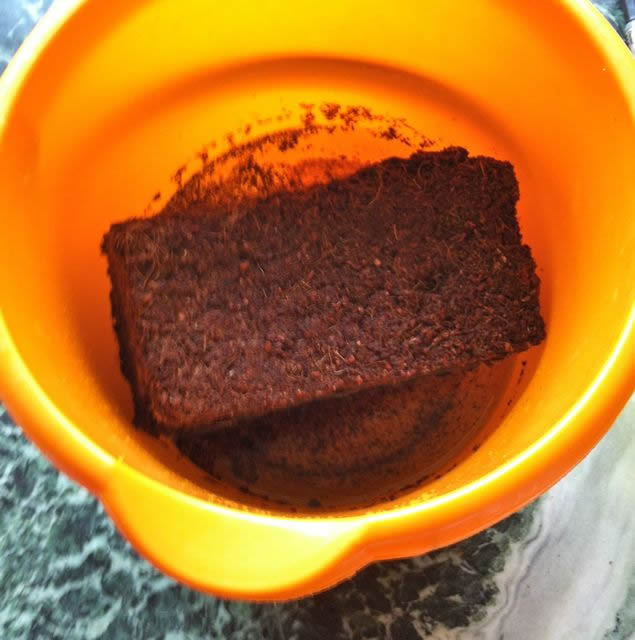
You will need to soak the Coco peat Coir Brick in water in the bucket. This does not take very long as the Coco peat readily absorbed the water and swells into soft and fluffy coco peat.
|
WATER |
| GLOVES We recommend wearing gloves when handling your seed material. This is not only to protect your hands from burning while handling the seeds that may be coated in capsaicin, but also to prevent the spread of pathogens through plant materials. Pathogens found in the garden can be transferred to your chilli seeds through hand contact. Included in these sources of pathogens is Tobacco found in cigarettes. If you are a smoker, we strongly recommend using gloves when handling plant material as Tobacco can carry the TMV (Tobacco Mosaic Virus) which can be spread to your seeds and is fatal. An article in the US Library of Medicine reported as much as 53% of cigarettes in their study carrying the TMV virus. Tobacco Mosaic Virus in Cigarettes |
This process can be aided by rubbing fingers along the soaked brick.

This really takes just a few minutes and the brick will expand several times its size. It will fill a bucket once fully expanded - give or take.
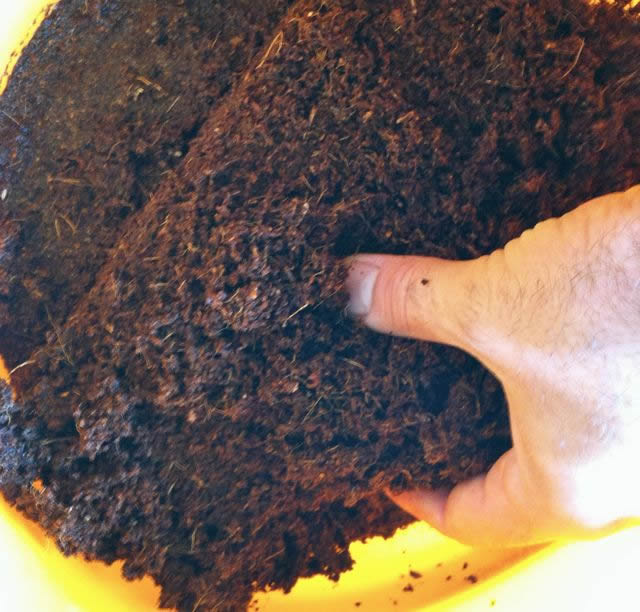
3. Fill your seedling tray
Once the Coco peat has fully broken down it should be nice and fluffy and moist. Make sure you break down any big lumps with your fingers.
You need to now fill your seed tray with the Coco peat. While the peat should be compressed a little, the emphasis is really - a little. The objective here is to leave the medium airy and light, so roots of the young seedlings don't need to force their way to grow roots - slowing them down.
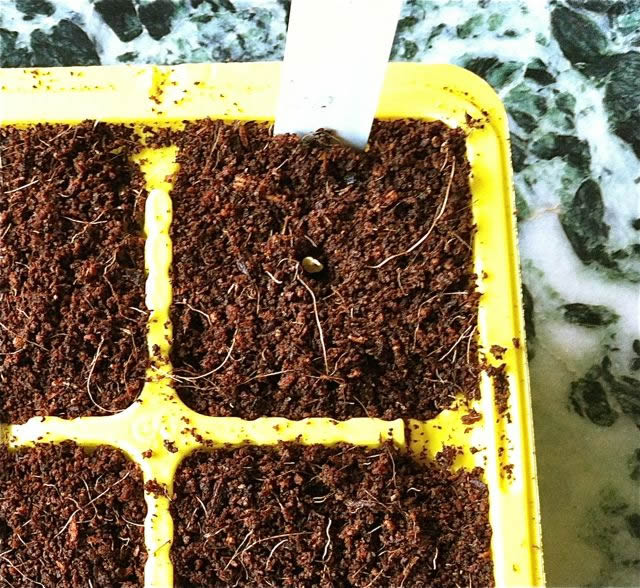
4. Make a hole

Make a hole in the Cocopeat with your pencil that the seed will be planted in. This hole should be no shallower than 5mm.
5. Label, Label, Label
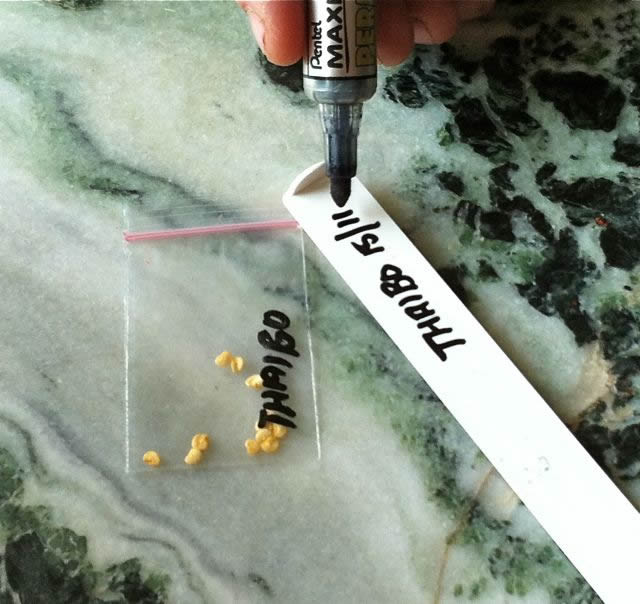
We can not stress enough how important it is to label as you go. When dealing with many seed varieties it is very easy to forget what you are planting. So please ensure before you do anything label as you go. Also, ensure your pen is a Permanent (waterproof) Marker. Seeing plants need watering, water soluble pens are no good as you will end up with tags that are blank further down the line. So invest in a good quality Permanent Marker and write on your tag the name and also the date when you are planting. This always comes in handy as you can see how long germination has taken.
|
PRE-SOAKING SEEDS |
6. Plant your seed
Once you have put the labeled tag in your seed tray cell. Plant your seed into the hole. When dealing with the super hot varieties, we strongly advise you handle the seeds with gloves. The capsaicin on the seeds will readily transfer to hands and any subsequent things you touch, and even though there is just a little capsaicin on the seeds, this can be very painful if it comes in contact with sensitive body parts such as eyes.
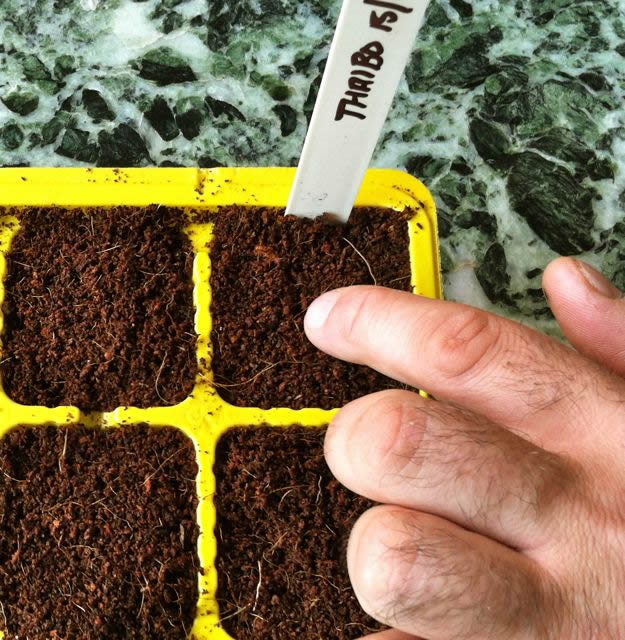
Once dropped into the hole, you will need to cover up the hole and gently firm down the Coco peat again.
7. Water
After you plant, it is always good practice to water. Gently water the seed you have just planted. Ensure that while watering you do not disturb the medium, so again - gently.
And that is it!
|
WATER |
Post planting notes
We recommend that chilli seeds be germinated in a controlled environment. For this we recommend a heating pad - or even better a propagator. For your seeds to germinate successfully, your germinating seeds require moisture (water) and heat. We recommend a constant temperature somewhere between 28ºC-32ºC. While you milder chilli varieties, annuums and baccatums will germinate at temperatures of 25ºC and up, your hotter verities require very hot temperatures. To ensure this, a Heating Pad is a great investment and can be obtained from our shop.
Another thing to point out is that your germinating seeds will require watering. The medium should never be soaked (waterlogged) but just moist to the touch. Over watering your medium will result in the seeds rotting in the medium. Insufficient moisture (medium drying out) will result in seeds drying. So watering is critical at this stage and requires sensitivity on behalf of the grower.
We would also like to point out that for germination to occur, your seeds do not require light at all. In fact we encourage you to germinate your seeds away from natural sunlight. Natural sunlight shining on your seeds germinating on a heating pad may very well cook your seeds in the medium. It will be too hot for germination. So germinate your seeds in a spot where they will not be reached by natural sunlight coming into the home.
We do not recommend germinating your seeds by windows. Especially in winter. While this may seem like a good idea, temperature fluctuations are too great and results will be poor if at all. Also, our sunlight is very strong and while chillies (when fully matured) enjoy lots of sun, young seedlings will cook if exposed to direct sunlight.
*Please note that you are free to download and use this information for personal use only (not commercially) and while free, copyright laws do apply. This means you are allowed to download but all content and images remain the property of Chillihead and may not be disseminated or reproduced for financial gain in any way or manner what so ever.

Chilli Seed Presoak Liquid
Chillihead Chilli Seed Presoak Liquid. We swear by presoaking chilli seeds. It dramatically speeds u..
R30.00

Chillihead Deluxe Grow Kit
Chillihead Deluxe Grow Kit. This Deluxe Kit includes both the Chillihead Germination Kit and the Chi..
R1,150.00

Chillihead Germination Kit
Chillihead Germination Kit. Grow like a pro with the Chillihead Germination Kit! With this plug a..
R650.00

Heating Pad Large
Heating Pad Large. This heating pad is specially designed for germinating your seeds. Ideally suited..
R250.00

Heating Pad Medium
Heating Pad Medium. This heating pad is specially designed for germinating your seeds. Ideally suite..
R165.00

Heating Pad Small
Heating Pad Small. This heating pad is specially designed for germinating your seeds. Ideally suited..
R85.00
")
Jiffy® 7C Coco Peat Pellets (12)
THIS PRICE IS FOR 12 JIFFY PELLETS Expanded Pellet: ±40x45mm Jiffy® 7C™ pellets give peppe..
R30.00
Jiffy® 7C Coco Peat Pellets (60)
THIS PRICE IS FOR 60 JIFFY PELLETS Expanded Pellet: ±40x45mm Jiffy® 7C™ pellets give peppe..
R120.00

